
Description
Aether Reverb Plugin for Space, Echo and Atmosphere
Aether is a reverb plugin combining spatial effects, echoes and stereo shaping. Nearly 2,000 presets, custom impulse responses and the Infinity system offer starting points for natural spaces and more experimental sound design.
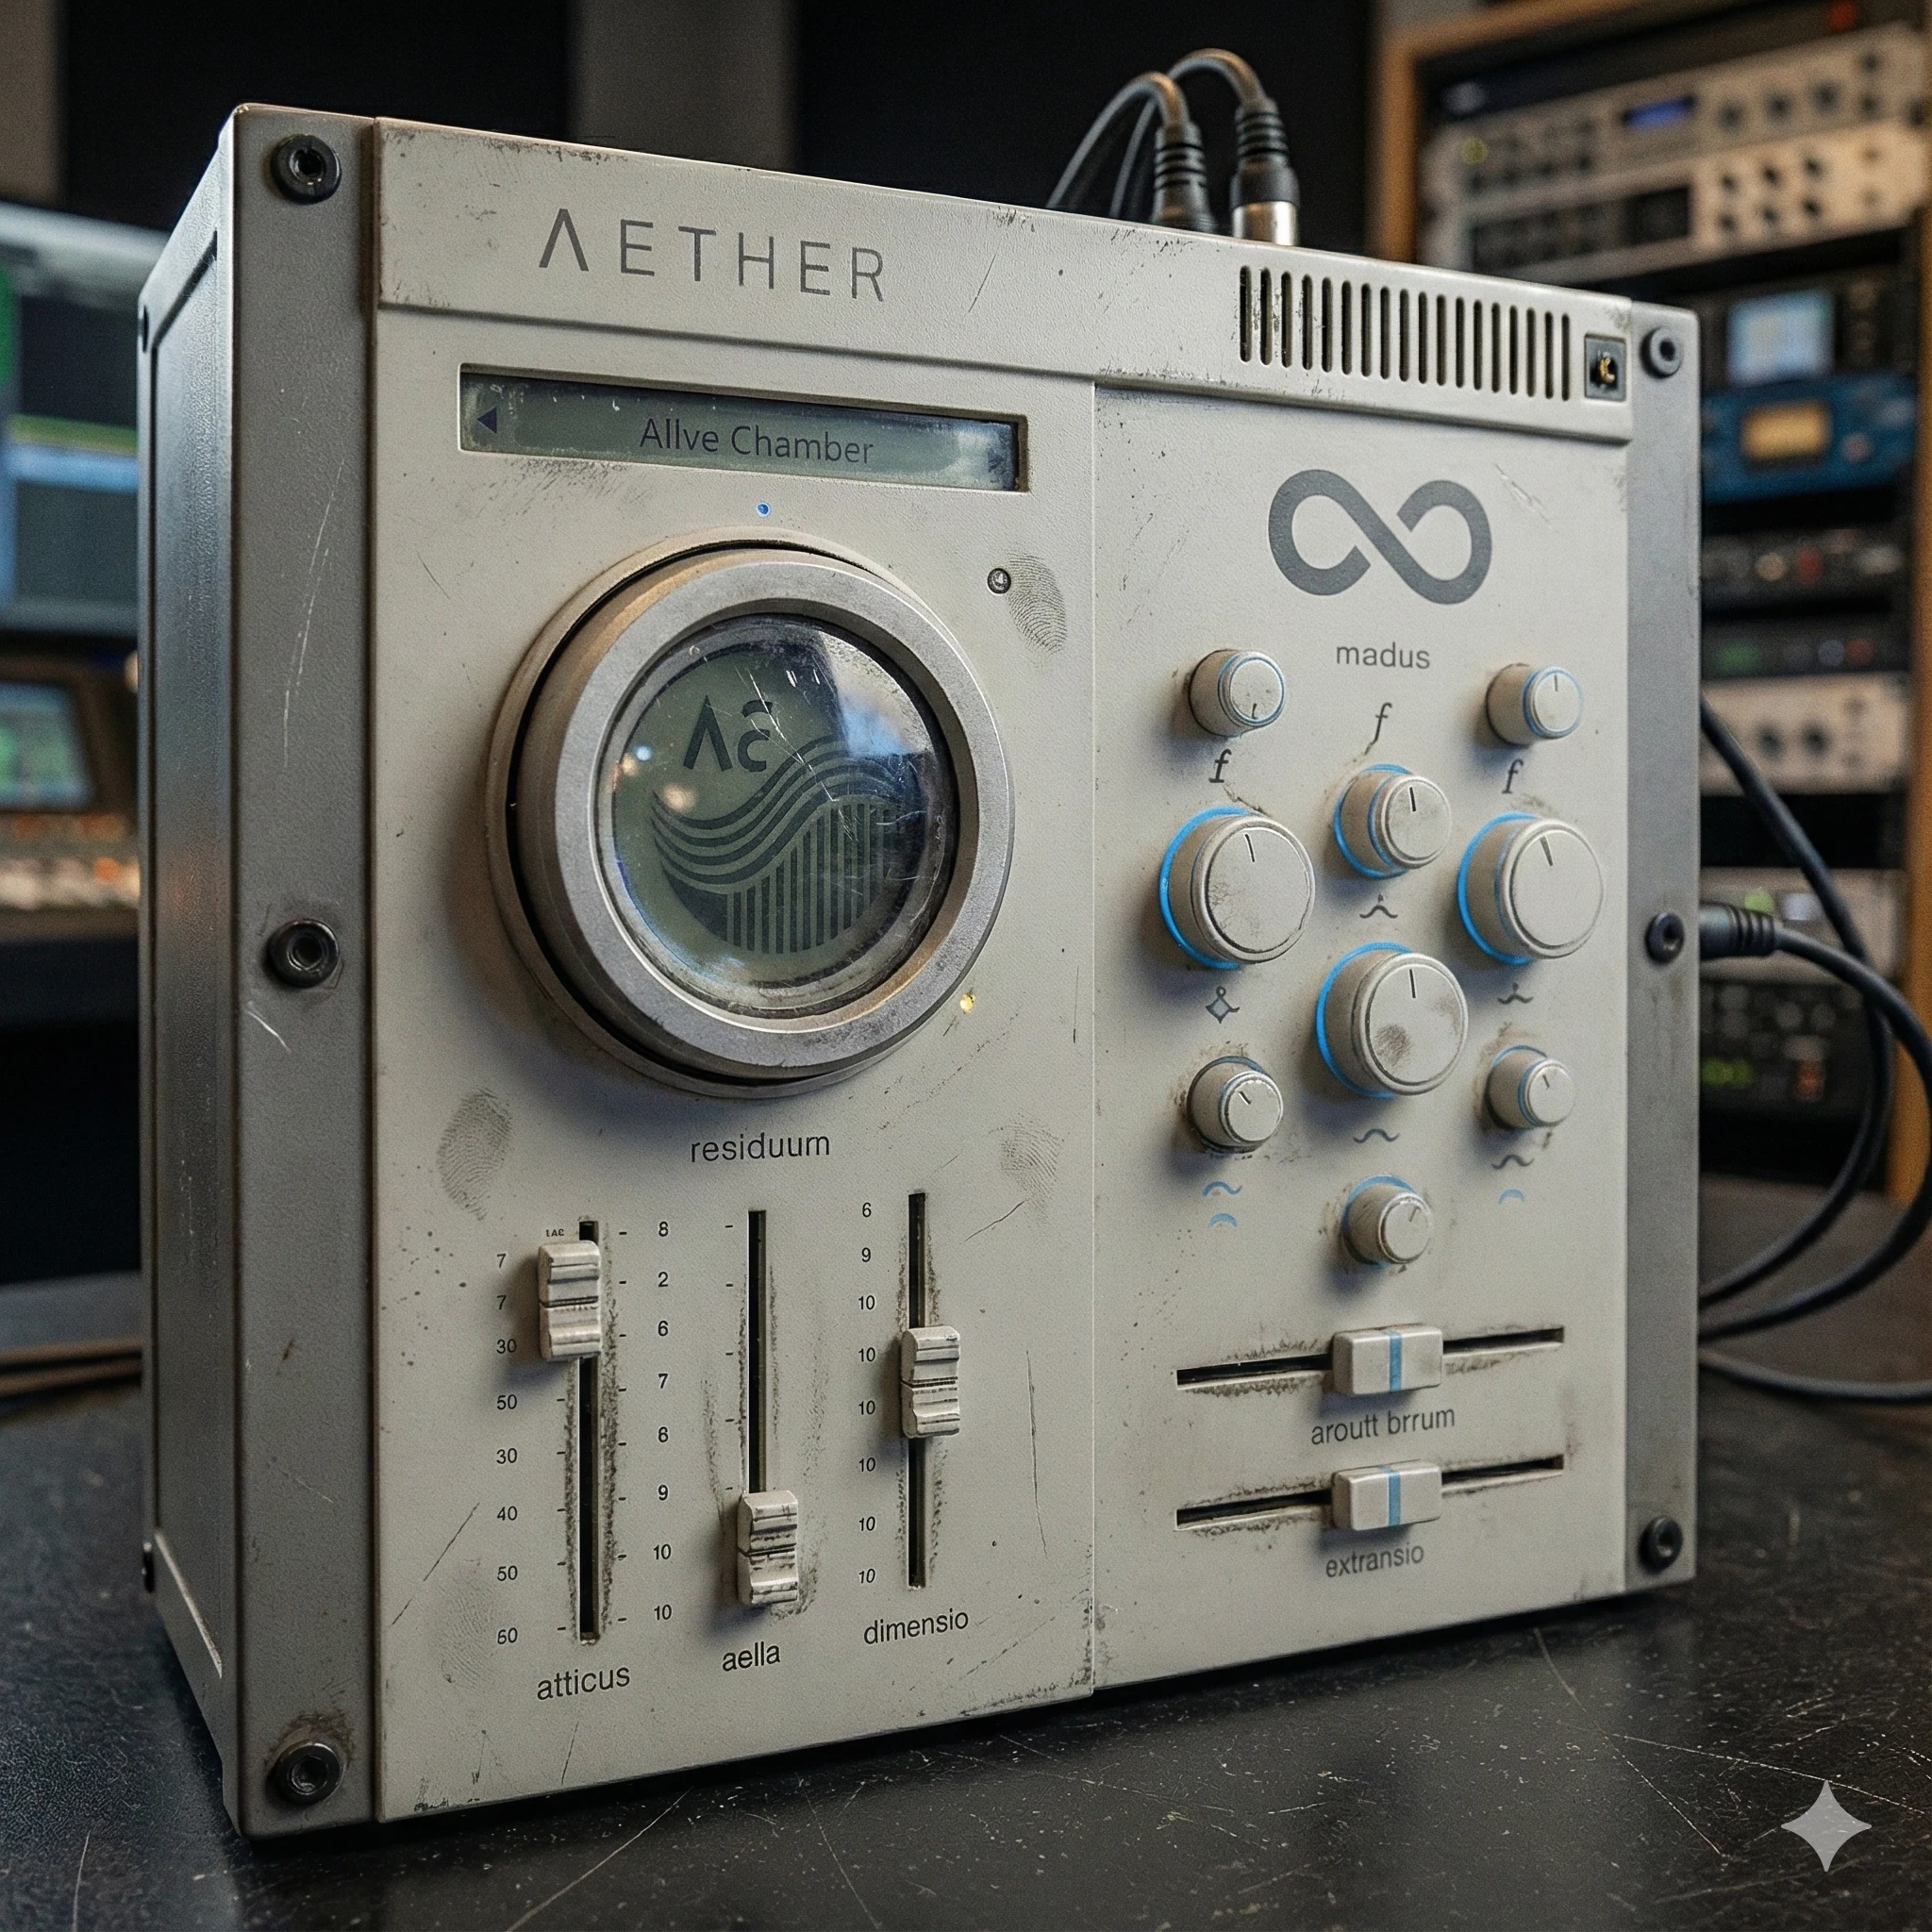
Aether: The Infinite Space Machine
Aether is not just a reverb. It’s not a delay. It’s not another time-based effects plugin you’ve heard before. Aether is built on the concept of limitless spatial design—a universe of sonic environments at your fingertips.
Rather than giving you a limited set of reverb models or a few templated delays, Aether offers thousands of unique spaces, each with infinite tonal variations. At its core lies a powerful algorithmic engine built from the DNA of the most iconic time-based effects processors in history.
With nearly 2,000 factory presets, Aether delivers every type of echo, ambiance, and reverb imaginable. And each preset isn’t a dead end—you can deeply customize the tone, spatial dimensions, and stereo behavior to craft something uniquely yours.
You’re no longer confined to traditional presets or locked-in spaces. With Aether, you can design the exact space or time-based texture you hear in your mind—and bring it to life.
Key Features
-
Massive Aether Preset Library
Nearly 2,000 factory-designed presets spanning every imaginable reverb and delay style. -
Iconic Algorithms Inside
Core engine built from the legendary algorithms of the most coveted effects units ever made. -
Unmatched Audio Quality
High-fidelity engine with uncompromising clarity and depth. -
Advanced Spatial Control
Sculpt each environment with an independent 3-band EQ and precise stereo field tools. -
Anomalia Module
Add subtle harmonic instability and movement for analog-style warmth and unpredictability. -
Infinity Aether Engine
Instantly generate a brand-new, randomized space with the click of a button.
Workflow and Compatibility
-
Wet/Dry Locking
Maintain consistent signal levels while browsing presets or using Aether in send mode. -
User-Created Presets
Save and recall your own creations using the full depth of Aether’s architecture. -
Community Integration
Download, share, and explore presets from other Aether users around the world. -
Scalable Ultra-HD GUI
Beautifully designed interface optimized for 5K displays with dynamic resizing. -
Load Custom Spaces
Import your own impulse responses or space models to craft reverb from scratch. -
Native Mac ARM Support
Full compatibility with M1, M2, M3, M4+ processors. -
Available Formats:
VST2, VST3, AU, AAX
System Requirements
Windows
• Windows XP or later
• 1024×768 minimum resolution
• 2GB free hard drive space
Mac
• OSX 10.3 or later
• 1024×768 minimum resolution
• 2GB free hard drive space
Changelog
06/12/2025 – v1.0.8 Public Release
02/10/2026 – v1.1.1 MAC Installer Updated
Reverb plugin: Common Questions
Can this reverb plugin create experimental spaces?
Aether includes Anomalia and Infinity controls alongside its preset library. Explore these tools for unusual environments, then use the wet/dry balance and tonal controls to fit the result around the source.
Can I use my own impulse responses?
Aether supports custom impulse responses. An impulse response supplies a different starting character for the space; use the EQ and stereo controls to shape the result for the track.
Explore more audio effects plugins at FlashVST, or visit developer Analog Legends for more about its music software.
Choosing a Reverb Plugin for Your Music
Reverb can make a part feel close, distant, intimate or expansive. Before choosing a sound, decide what the space should do for the arrangement. A lead vocal may need depth while staying clear, a synth pad may benefit from a wider atmosphere, and a short percussion sound may need only a small sense of room. These goals are more useful than choosing a preset simply because it sounds impressive on its own.
Aether combines a reverb plugin workflow with echoes, stereo shaping, custom impulse responses and creative spatial tools. Nearly 2,000 presets provide a large set of starting points. The useful question is how quickly you can move from a starting point to a space that supports your track. Use the demos and feature descriptions to compare that workflow with the way you already make music.
Preparing a Sound for Your Reverb Plugin
Listen to the source before adding an effect. Note how much natural room or ambience is already present, how sharply the notes begin and how long they sustain. A dry sample and a recording made in a live room can respond very differently to the same setting. If the original sound already has a strong space around it, consider whether another layer will complement that character or blur it.
Keep a short passage of the full arrangement playing while you audition your reverb plugin. A sound that fills an empty solo channel beautifully may crowd a busy mix. Begin with a restrained wet/dry balance and increase the effect until it serves the musical idea. Return to the dry signal occasionally so you do not lose your reference for clarity and timing.
Reverb Plugin Settings and Musical Timing
Longer or denser effects can overlap with later notes and change the sense of movement. Listen to the gaps between phrases as well as the phrases themselves. If the effect fills every pause, the performance may lose some of its contrast. That can be desirable for an atmospheric texture, but it may be less suitable for a sharply defined rhythmic part.
Aether’s echoes and spatial processing give you several directions to explore. Compare a subtle environment with a more obvious effect, then decide which one supports the role of the instrument. Avoid judging a sound only at the loudest point of a song. Check an introduction, a breakdown and a dense section so the chosen space remains useful as the arrangement develops.
Shaping the Tone of a Reverb Plugin
A reverb return can add more than depth; it can also change the apparent tonal balance. If the mix becomes cloudy or sharp when the effect enters, listen to the wet signal and identify the area that draws your attention. This reverb plugin includes three-band EQ, which gives you a way to shape the effect rather than immediately changing the source instrument.
Make broad adjustments first, and compare them at a similar listening level. The best setting is not necessarily the brightest or darkest. It is the one that leaves the important musical information easy to follow. A reverb plugin can provide atmosphere without occupying the same space as every other element in the arrangement.
Checking Reverb Plugin Width in Context
Width can make a sound feel spacious, but it is useful to check what happens when the arrangement is heard in a more restricted stereo image or in mono. Listen to whether the core part remains clear and whether the balance changes unexpectedly. The goal is to understand the tradeoff you are making, particularly when a wide effect becomes an important part of the sound.
Use Aether’s stereo controls alongside the level and tonal controls. A very wide effect may need less level to communicate space, while a narrower treatment may suit an intimate vocal or a centered rhythmic part. Compare the whole arrangement before deciding. Width, loudness and tone interact, so changing one can alter how you perceive the others.
Use Custom Impulse Responses and Creative Tools
Custom impulse responses offer another starting character for the effect. Choose a response with a clear purpose, listen to it on the intended source and then refine the balance. Do not assume that a name alone tells you how an impulse response will sound in your song. Its interaction with the source and the rest of the processing matters more than its label.
Anomalia and Infinity provide options for less conventional spaces. When exploring them, keep a useful reference version of the sound available. Generate or adjust one idea at a time, then decide whether the result creates an interesting musical role. This approach lets the reverb plugin become part of sound design without turning the session into an endless search for a new preset.
Comparing Reverb Plugin Presets
Use the same passage when comparing several presets. Keep the wet/dry balance reasonably consistent so an especially loud effect does not win the comparison by default. Listen for depth, intelligibility and the transition between notes. Once you find a promising family of spaces, spend time refining it before moving to another part of the library.
Check the supported plugin formats and system requirements before buying. Think about whether your main need is everyday ambience, creative effects, custom impulse-response work or a combination. Aether offers several ways to approach those tasks, but your own workflow should guide the decision. The examples here are general production starting points; the feature list remains the reference for the controls included in this reverb plugin.
Using a Reverb Plugin on a Shared Send
A shared effects return can help several instruments feel as though they belong in the same space. In your DAW, create an auxiliary return and send a small amount of each suitable source to it. When the return is intended to supply only the effect, check its wet/dry configuration so you do not accidentally duplicate the dry signal. This is a general routing approach; the exact setup depends on your host.
With a reverb plugin on the return, the send level determines how much of each source enters the space. A background part can receive more than a lead part, while both share the same character. Listen to the combined return before adding further effects. If one instrument dominates it, adjust that source’s send rather than changing the entire mix. Aether’s wet/dry locking can help maintain a consistent balance while you compare presets.
Choosing Between an Insert and a Shared Effect
An insert can be useful when a spatial treatment belongs to one particular sound. For example, a transformed percussion hit or an atmospheric synth layer may need a dedicated effect whose settings would not suit the rest of the arrangement. A shared return is useful when several parts should use a common environment. Neither approach is automatically better; choose the routing that makes the musical role easier to control.
Before adding another reverb plugin instance, check whether an existing return already provides the space you need. Fewer competing environments can make a mix easier to understand. Conversely, keeping a distinctive sound on its own return can make later adjustments simpler. Name your tracks and returns clearly so the routing remains understandable when you reopen the session.
Saving Reverb Plugin Settings for a Project
Once a setting works, save a clearly named version before making a major change. Include the musical role in the name, such as a restrained vocal space or a long synth atmosphere. Aether supports user-created presets, so you can keep promising starting points for later sessions. A preset is still a starting point: different recordings may need a different effect level or tonal balance.
If you use custom impulse responses, keep the source files organized with the project according to your DAW’s file-management workflow. A preset name alone is not a substitute for retaining the assets that a session may depend on. When moving a project to another computer, verify that the required plugin version, format and any external files are available before relying on an old session to open identically.
Checking the Finished Reverb Tail
Play the end of the arrangement and listen beyond the final note. A sustained effect may continue after the instruments stop, so leave enough room in the export range for the intended decay. Also check transitions where a long tail crosses into a quieter section. The reverb plugin should support those moments deliberately, rather than leave an accidental wash behind them. Compare the exported file with playback in the session to confirm the ending behaves as expected.
Reverb Plugin Starting Points for Vocals
For a lead vocal, begin by listening to the words rather than the size of the effect. Consonants and the ends of phrases should remain easy to follow. Bring the effect up until it adds the intended depth, then check the vocal with the accompaniment playing. If the result feels impressive in isolation but makes the lyric harder to understand, try a less prominent space or a lower send level.
Backing vocals can serve a different role. A shared environment may help several layers feel connected, while a lead stays more immediate. Compare the balance during both sustained notes and quick phrases. The same reverb plugin setting can feel very different when several voices feed it at once, so judge the group as well as the individual tracks.
Adding Space to Drums and Percussion
A short percussion sound provides a clear way to hear the character of an effect. Listen to the initial hit, the space immediately after it and the way the tail meets the next hit. Start with a simple pattern before auditioning the busiest part of the song. This makes it easier to hear whether the spatial treatment adds groove or softens the rhythm more than you intended.
When using a reverb plugin on a drum group, pay attention to how the low-frequency elements affect the return. If the space becomes heavy or indistinct, compare a more selective send arrangement with sending the entire group. This lets you decide which elements actually need ambience. Keep checking the dry attack so the effect does not obscure the impact that made the original pattern work.
Building Atmosphere Around Synths and Samples
For sustained synths, sound design can start with the relationship between the source and its surroundings. A busy patch may already contain modulation, delay or ambience. Listen to those elements before adding another layer. A simpler source sometimes gives an elaborate space more room to contribute, while an already detailed sound may benefit from a restrained treatment.
Aether’s creative controls can turn this process into exploration, but keep the musical purpose in view. Compare the new texture against the rest of the arrangement and save a useful version before moving further. Try the reverb plugin on one contrasting source to understand which part of the result comes from the source and which comes from the space. These comparisons help you build reusable production judgment, rather than a collection of settings that only work by accident.
Before committing to a reverb plugin purchase, write down the two or three tasks you expect it to solve. Compare those needs with the documented features, available examples and compatibility information. A clear purpose makes it easier to judge whether the tool belongs in your setup.




Reviews
There are no reviews yet.